A guide for beginners.

Introduction
So, you want to install linux. Before I start, let me get this straight. Linux is a kernel, so what you are probably looking for is a linux distribution, which is rather incorrectly called “linux”. The kernel is an operating system component which manages most of the low-level stuff on a computer. Every operating system has a kernel.
On the other hand, a linux distribution, also called a “distro” is a collection of software packaged with the linux kernel, which provides most of the functionality which you can expect from a computer, such as the ability to watch Netflix or play games. There are hundreds of linux distros to fulfill a variety of needs. Some of them are designed to be run on servers, while others are meant to be used by users like you and me. Popular ones include Linux Mint, Ubuntu, Manjaro, Fedora and Pop_OS.
In a typical scenario, people choose to install a distro which they like, but due to the sheer variety of distributions, choosing one can be overwhelming, especially for the inexperienced. Therefore, I will be describing the steps to install Ubuntu 20.04 LTS and provide a few tips to install other distros too.
This guide is divided into five sections based on the various install stages that need to be performed. Here is an overview of the stages:
- Prerequisites
- Partitioning
- Additional Prerequisites
- Installation
- After-Installation
Prerequisites
Installing a new operating system is a major change for your computer (or your hard-disk at least), so the first prerequisite is time, or at least a few hours of a day. Spending a weekend is recommended, because if something goes wrong, you will have some time to fix it.
Hardware Support
Downloading the distribution, burning the .iso file and then having to face issues due to unsupported hardware is a painful experience. Instead, the first thing before you install any distro is to search online for compatibility issues between the distro you intend to install and your particular computer. In case you find any issues, note down their solutions (or take a picture on your phone). Ubuntu usually supports a large variety of hardware, and problems are rare, unless your computer was recently released. However, note that some distributions consume a lot of system resources and may not provide a good experience if you are using hardware which more than a decade old. Your computer will require at least 4Gb of RAM and about 25Gb of storage space for a normal installation of Ubuntu.
The first stage in the installation process involves booting the distribution from the USB drive. This is done by powering off the computer and pressing a special key (F1 or F2 or F10 or F12) when the computer just begins booting. In case the boot menu (the special menu where you can manipulate some hardware features) does not show up, try searching online for the correct key. Press the key immediately after the logo of the computer manufacturer is shown. Pay special attention to any messages or options which you see in the menu shown after the keypress. Remember this key for the next step. Navigate the menu and disable “Secure Boot”. Disable “Fast Boot” option too. The exact steps to disable both depends on the interface which is shown to you after you press the special key, and this varies between different brands of computers (technically depends on the motherboard in your computer). Remember to reboot after making changes and make sure that everything in the original OS (Windows) is working.
In case you are using a Mac, you need to press the Option/Alt(⌥) key. This will show you a list of options to boot from, whereupon you need to select the “EFI Boot” option. This stage of the guide is meant to explain how to actually boot the USB drive and not how to install the distro. So even if you select the “EFI Boot” option, it won’t start the new OS unless your USB drive is connected (and Secure Boot is disabled). On a Mac, “Secure Boot” can be disabled using Apple’s official guide for Secure Boot. For a complete list of special keys which can be used in Macs, see this guide here.
USB Drive
Download the .iso file for the distribution of your choice (in this case Ubuntu 20.04 LTS). You can download the file from here. Files for other distributions can be found from their respective websites, for example Linux Mint can be downloaded from here. In case of Ubuntu 20.04 LTS, the download is about 3Gb in size, so ensure you have a “good” internet connection before starting. Also ensure that the USB drive which you will be using has a capacity of at least 4Gb.
The next stage is “burning” the .iso file which you downloaded. If you are using Windows, then this can be done using a tool called Rufus. Download and run the tool (requires admin privilege) and select the .iso file within the tool. After this, connect the USB drive which you want to use. Ensure that there are no important files in the USB drive, since Rufus formats the drive before copying the iso. Start the process. This is not a simple copy-paste operation, hence we are using this utility. It’s similar to how files were copied onto CDs back in the day.
In case you are using a Mac, install Etcher and follow the above process.
Note:
Some linux distributions have multiple variants (also called flavours), which differ from each other by either their selection of programs or by their look-and-feel. Ubuntu 20.04 LTS has several different flavours. Some of the popular ones include Kubuntu (KDE-based) and Lubuntu (for older devices). You can read more about them here.
Booting Up
Remember the key which you pressed while changing the boot settings? If not, then try entering the same menu again (reboot and try pressing F1/F2/F10/F12/<your_special_key>). After you try this a couple of times, power off the computer, insert the USB drive into your computer, start the computer, and enter the menu by pressing the key. Search for an option called “Boot Order” or “Boot Priority”, then change the priority of the devices being booted. This can be done by moving the listing of the USB drive to the first position. If unsure, check online for how to do this on your computer. Save the changed boot order and reboot. Again, how to do this depends on the interface provided by the manufacturer.
After the computer reboots, you will observe a simple menu showing some more options. Select the default option “Ubuntu”. After this, from the GUI-installer, select “Try Ubuntu…”. Congratulations ! You have succesfully booted Ubuntu.
Before you get too excited, try checking for any hardware issues (broken WiFi, Ethernet, Bluetooth etc.). Check if the problems which you found online in the “Hardware Support” stage are present. If not, you are ready to proceed.
Note:
The above process is similar in most other distros, such as Pop_OS and Linux Mint, but differs in case of advanced distributions such as Gentoo and Arch. Spend some time using the distribution to get a feel of how things look and behave.
Partitioning
After trying out the distribution, you may have noticed that the files which you download, or create are not saved permanently. This is because this version of the operating system is not really installed in your hard-drive. Rather, it runs by copying its files into your system’s RAM. To install Ubuntu on your computer, you first need to create partitions on your hard-drive, using tools available in your present operating system.
At this stage, you have two choices:
- Install Ubuntu alongside your current OS (dual-booting)
- Install Ubuntu on your hard drive, thus replacing your current OS (clean-install)
I will be demonstrating the first option since most people often need their default OS for work or school. In case you want to perform a clean install, just boot the USB, and from the GUI installer, select “Erase Disk and Install Ubuntu”. Simple.
Note:
Although the clean install option looks simple in this case, it’s not always so in other distributions. Gentoo and Arch Linux are two distributions which have a command-line only installation, which is much more difficult than a GUI-based install. Another thing to remember is that a clean-install formats the entire hard drive, so your existing OS’ files are also removed. In case you wish to continue with a clean install, remember to create an recovery medium or USB drive to install your original OS at a later time.
Shrink Partition(s)
Although partitioning can be done from the live USB (the one which you booted), I recommend using the partitioning tool available in Windows. Reboot to your Windows OS, then start the “Run” program and type diskmgmt.msc
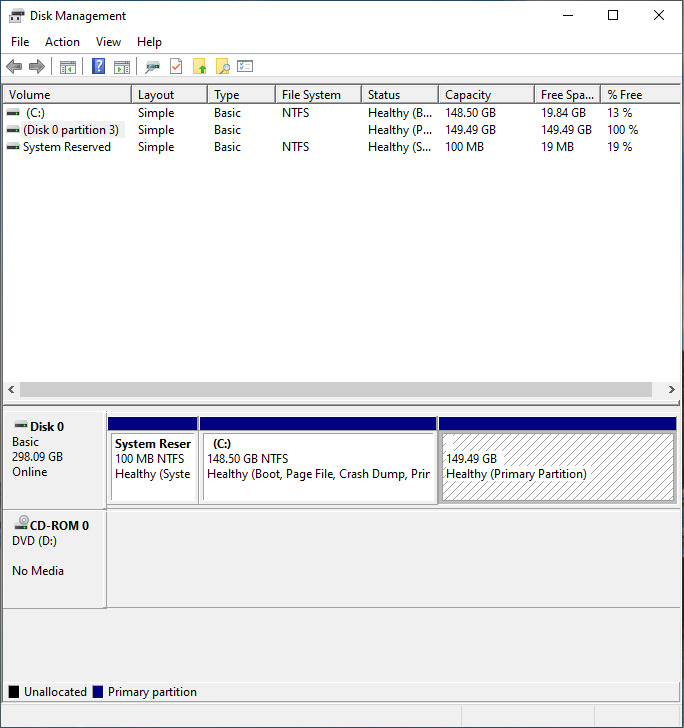


For most people, the ‘C’ partition is the one which they will need to shrink. We need to create space on the hard drive to install the distro. As mentioned in the system requirements for our version of Ubuntu, at least 25Gb of hard disk space is required, but it’s recommended to go for a little extra space. On Windows [7/8/10], the following steps must be done.
- Right-click the ‘C’ partition.
- Click “Shrink Volume…” from the menu.
- Enter the “Amount of space to shrink”. (30Gb = 30*1024 Mb = 30720 Mb)
- Click “Shrink”. (This process may take some time)
Note:
Some computers contain many more partitions than shown in the example above. In case you see multiple partitions, and you haven’t manually created them, search online for which of them can be shrunk. If your computer came with Windows pre-installed, then another partition which you may see alongside ‘C’ is ‘Recovery’. Do not shrink partitions labelled “System..” or “EFI..”
In case you are using a Mac, the way to partition a hard drive is different. You need to use the built-in Disk Utility program to do so. Here is Apple’s official method for doing so.
Additional Prerequisites
Before you continue, there is one point which must be kept in mind while installing any OS on your computer. Booting a computer is a complex process, and a necessary component in the process is the firmware which loads the appropriate program to load the operating system. You can find details about the linux booting process here. In modern computers (anything which came pre-installed with Windows 8 or above), the UEFI firmware can be found. However, older computers use BIOS firmware. Therefore, you may encounter one of the following: BIOS or UEFI. This post is a must-read to understand the differences between the two. Go on, read it. I’ll wait.
Firmware Type
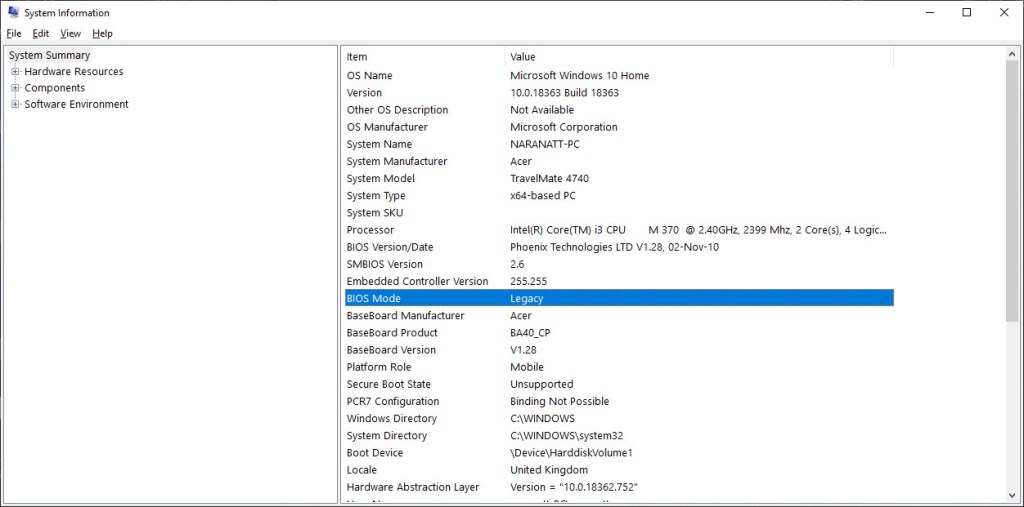
To check which type of firmware exists in your computer, you can start the program “Run” on Windows [7/8/10]. Then typemsinfo32
Check for the line shown in the image. If the field is set to “Legacy”, then your computer is booting in BIOS mode. If it is set to “UEFI”, then your computer uses UEFI for booting.
If you are using MacOS, then you will probably need to refer to another tutorial on the internet, since Apple uses a custom firmware. There is a wikipedia page about it, which provides an overview of the implementation. However, if you have continued till this stage, then refer to this post here for a simple dual-boot of Ubuntu with MacOS. The steps performed till this point are the same for Macs albeit further steps vary slightly.
Note:
If your computer has a BIOS firmware, then you can instruct the Ubuntu installer to install the OS to a new partition in the free space which you created, and the bootloader will be chain-loaded from the MBR.
Some UEFI firmwares also support BIOS compatibility mode (also called CSM/Legacy boot). In this case, hit the same special key from the previous “Prerequisites” stage, and change the setting to only support UEFI. In case you have a BIOS firmware, then this setting won’t be visible. As always, check online for how to do this on your machine, and for possible issues, if any. Also don’t forget to disable “Secure Boot”, “Quick Boot” and “Windows Fast Startup”, if you haven’t done so already (UEFI only).
Installation
In this step, we will be finally installing Ubuntu. For other distributions which also use a GUI-based installer, the process will be similar. Since most computers today use UEFI firmware, I will be describing the steps specific to UEFI-based computers. They are roughly as follows:
- Boot the live USB (follow the steps in “Prerequisites” and “Partitioning”).
- Before starting up the installer, verify if you have booted using UEFI. This can be done by opening up a terminal (Ctrl + Alt + T), and typing
ls /sys/firmware/efi
If you see some files and folders here, it means you have booted in UEFI mode. If not, try going back to boot settings to disable Legacy/BIOS mode. - Start the installer. The option to install will be visible on the desktop. For other distributions the process will be similar (exceptions: Arch Linux and Gentoo) check for an installer program on the desktop after the GUI is loaded. (Right-click to view the image)
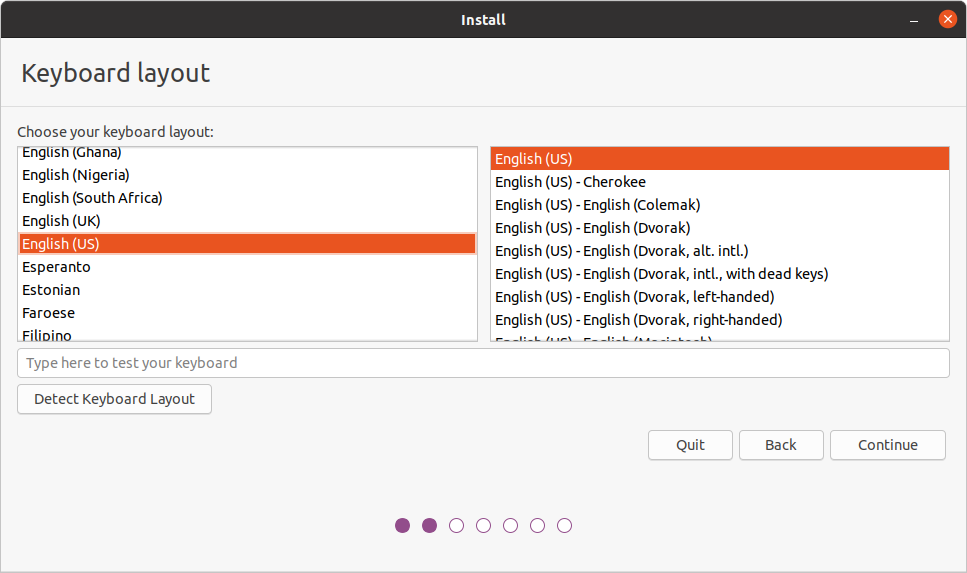
- Follow the on-screen instructions to set-up your language and keymap. In other linux distributions, the steps to follow are almost the same, but their installers may be different and thus proceed through a different series of steps.
- Select the option to install third-party drivers (unless you really hate non-free drivers). Selecting this checkbox can help prevent some issues like non-working WiFi or Etherent. Also ensure that your internet connection will remain stable (preferably connect using an Ethernet cable) for the entire duration of the process.
- After you have selected the software to be installed, the installer will ask you about the type of installation which you need. The easiest method is the first option (shown in the image below). This will install the bootloader in the existing ESP partition, thus sharing space with the Windows Boot Manager. Use this option if you have Windows 7 or 8. The third option is usually the best when dual-booting (opinion). Choosing the third option will give you more control over the installation process, but a drawback is that you need to press the “special” key while booting, whenever you want to switch operating systems.

- If you select the first option, the Ubuntu installer will automatically perform the required steps for installation, and you can proceed to step 9.
- If you decide to go for the third option, then beware: Windows does not support multiple EFI partitions, so your ability to boot Ubuntu may depend on the implementation of the firmware by your manufacturer. I have dual-booted Ubuntu on a 2016 Asus Vivobook, so if you select the third option, it may work for you too.
- Select the free space you created during the “Partitioning” stage and create two new partitions. You can see the location of the free space using the legend shown below the bar chart. The following two partitions must be created:
- EFI System Partition (size = 512Mb)
- This partition must be formatted to the filesystem FAT32 (or EFI System Partition). Right click the free space and click “Change”. Using the dialog box which pops up, set the size of the partition to 512Mb, and the “Use as” parameter to “EFI System Partition”. This partition must be formatted to the filesystem “FAT32” (or EFI System Partition).
- Root Partition (size = 29.5Gb = 30208Mb)
- Then create a second partion of size 25Gb or so in the remaining free space. Alternatively, use the entire remaining free space for the second partition. This partition must be formatted to the filesystem “ext4” (or Linux Filesystem).
- You may choose to format to the partition to a different filesystem, but remember to read about the advantages and disadvantages of your choice before committing.
- EFI System Partition (size = 512Mb)
- Ensure that the correct partitions are being modified and select write the changes to disk. This process may take some time if your secondary storage is not an SSD.
- Continue with the installation by selecting the timezone, your username and password and wait for the installation to complete.
- Your new distro has been installed. Reboot the live USB and remove the USB drive when requested to do so.


After Installation
Common issues after installation include:
- Computer booting to the original OS, and not Ubuntu (or another distribution)
- Wi-Fi/Ethernet/”something else” not working
The first issue can be solved by hitting the same key from “Prerequisites” stage while the computer is booting up. Check for an option called “Boot Order”, also called “Boot Sequence”. Change the priorities of the operating system as follows and reboot.
- Ubuntu
- Windows
The second issue can be solved by installing the appropriate drivers. A lot of questions have been answered on AskUbuntu for Wifi/driver related issues, and most, if not all solutions can be found there.
Note:
In case you are unable to change the boot sequence from your boot settings, search online for your particular model of computer.
Enfin
Congratulations ! You just installed a new operating system yourself. Hopefully, you will find linux distributions as interesting as I did. For any suggestions/corrections, please use the comment section below.