Part – 01
Reading Time | ~12min
Git is a version control system. A version control system or a VCS for short is a software tool used to keep track of changes made to files. In the field of software development, it tracks changes made to a software project.
For example, imagine a student who wishes to keep track of changes made to a school report about aquatic plants. While typing the report, she may come up with multiple variations in her work. One copy of the report may have no images, another may have a few extra examples of aquatic predators and another may simply include corrections made to the report on her teacher’s suggestion.
One way in which she can manage multiple copies of the project report file is by manually renaming copies of files each time a change is made to it. When she adds the content suggested by her teacher, she may rename the file to ‘aquaticReport-v4’, and on adding additional examples, she may rename it to ‘aquaticReport-v5’. This method is prone to errors, and manually renaming versions of files becomes nigh impossible for larger projects.
This is where Git and other version control systems come handy. Git helps to keep track of various changes made to a project or a file by taking snapshots of the system under consideration. This system is usually a folder which is directly tracked by Git, and which contains the files of the software project (or any project for that matter).
A Brief History of Git
Git is yet another example of the open source community developing a long-due software tool. In 2005, when Git came into existence, other version control systems existed but were handicapped by limited speed and the absence of strong safeguards against data corruption. In fact, the needs of Linux kernel developers directly shaped the development efforts of Git. To read more about the design requirements of Git, refer to the Wikipedia page on Git.
I have been using Subversion, so…
In case you are already acclimatised with another version control system, this guide won’t try to help you jump ship from a different VCS. For a detailed comparison of Git with other systems, refer to the free e-book by Scott Chacon and Ben Straub.
Bon Voyage

Before I continue, here are some key terms which you will often hear when people talk about Git.
Repository
A repository or a "repo" is a place where the files to be tracked are stored. A repo is a folder containing the ‘.git’ folder along with other files or folders to be tracked. The .git folder is automatically created and managed by Git. Besides containing source code for a software project, Git can also track any other type of files, such as images or audio files. You can also blacklist the tracking of some files by using a file named .gitignore. This file contains the list of files to be ignored by Git or regex for ignoring files matching the pattern.
Remote
A remote is another repository which is updated by many different people with their contributions to the code for a particular project. A remote is usually hosted by a hosting provider, such as GitHub or Bitbucket. Remotes may be hosted on a dedicated server, or even in a different location in the local filesystem of a computer.
Hosting Provider
GitHub and Bitbucket are two popular hosting providers. These hosting providers lease some space on their servers to allow people to host their remote repositories. Members of a software development team can then copy the contents of the repository to their local machines when they start working. A hosting provider is required because sharing updated versions of software and files constituting it is impossible without knowing who has the most recent copy. This problem is compounded by the fact that multiple people may have slightly different copies of files, where each copy eventually needs to become a part of the software. This makes sharing in a peer-to-peer manner impossible.
Cloning
It is the process of creating a local repository from the remote repository. This operation is performed using a special command, and is one of the first things people learn to do, when using Git. The local repo contains an exact copy of files from the remote repository after cloning. Git allows people to continue working even when they are offline, unlike in other version control systems.
Commit
A commit is an operation which requests Git to take the snapshot of the folder under version control. This means that any files which have been staged for commit are included in the snapshot, while those which are modified and unstaged or untracked are not included in the snapshot. Each commit is identified by its SHA-1 hash, and contains other metadata such as the name of the person performing the commit, his email ID, and a message explaining the reason for the commit. Internally, Git stores a commit as a commit object.
Staging Area
The staging area contains the files which need to be added to the next snapshot of the project. For example, adding a file to the staging area will make Git track changes to that file. If a commit is performed when some files are in the staging area, all those files will be added to the snapshot of the system, and will be tracked by Git as long as the user wants them tracked. If a file is not added to staging area, then the changes made to the file will not be a part of version control. This means that if you forget to add the file to the staging area and the file becomes corrupted, then it won’t be recoverable. When a file is added to the staging area, it is said to be staged for committing. Staged files and folders can be seen using the command line, or a GUI client for Git. Contents of a project can also be tracked without adding them to the staging area. This is performed by using a special flag with the commit command. However, this isn’t usually performed since it is useful to see if the correct files are going to be tracked before committing.
Working Area
When a file is being edited, or a new file is created, Git adds these files to the working area. These files will not be included into the next commit unless they have been added to the staging area.
Note:
A file can be a part of both the staging and the working areas. Consider this scenario. A file is added to the staging area. After some time, a few more changes have been introduced into the file. In this case, the file will be a part of both the staging area as well as the working area. If at this point, a commit command is given, then the older version of the file (added during last staging process) will be committed. The newly introduced changes will not be committed unless the changed version of the file is again added to the staging area.
Branch
A branch in the development allows you to work on different parts of a project without affecting other important parts. For example, to succesfully include a new feature without breaking existing ones, it may be necesssary to copy the files of the project into another folder so that you don’t mess up the original code. Git does this automatically when you checkout a new branch. However, branching will be covered in the second part of the guide.
Using Git with a GUI
Although GUI clients exist, using Git on the command-line is recommended since in the long haul, GUIs may change but the underlying commands rarely do. Before continuing with this guide, please install Git on your system. Using the command line may be daunting for some of you, but it’s certainly worth the extra effort.
However, in case you have an aversion for the CLI, download a GUI client such as GitHub Desktop. In this case, the choice of GUI is entirely yours. The operations specified in the remaining paragraphs can be easily performed using the GUI, albeit with lesser direct control.
To install Git for command-line usage, each operating system has a different installation procedure.
Windows
Git can be downloaded from the official website for Git. After completing the installation, you can continue with the next section of this guide.
MacOS
Installing Git on MacOS and Unix-like distributions is easier due to the availability of package managers. To install, follow the steps shown in this gist
Linux-based Distributions
In case you are running linux, you’ll need to consult your manual for the package manager on your system. In case you are running a version of Ubuntu or a distribution based on it, such as PopOS or Elementary OS, just run the following command in a new terminal window.
sudo apt install git -y
You will usually need the root password for the installation.
Note
In each command, do not forget to replace with the thing which you need to use. For example, in the command, `git clone ` replace with the URL of the repository, i.e. https://github.com/Rapteon/lets-git-it.git.
In case the command is something like some-command "",
then substitute “ with the correct value to some-command "My edit to the code."
Learning Time 🕚
Here is the task to be performed:
- Clone a Git repository.
- Make some changes to files within the repository.
- Add the changes to the staging area.
- Commit the changes.
- Push the changes to the remote.
Note:
If you are already comfortable with the above steps, you can continue with the second part of this guide.
Cloning the Repo
To simplify the learning process, I have already created a repository which can be cloned. In case you want to try with your own repository, create a new repository on GitHub by following note given below, and then continue with the cloning process. If you choose to go with the latter option, you will not have problems pushing changes to the remote repository.
- Navigate to the repository page on GitHub.
- Click on the ‘Code’ button and copy the URL.
- Open a new terminal. In Windows-based systems, open Git Bash.
- Type the following command.
git clone <url>
Note:
In case you would like to create your own repository from scratch, the following steps can be followed:
- Make a new folder.
- Switch to the new folder in the command line by typing
cd - Initialize a .git repository by typing
git init - If you list the contents of this directory, either by typing
dir
in Windows or
ls -la
in MacOS/Linux-based OS, you’ll notice that a new directory named .git has been created. - Create a new repository in your GitHub account by following this guide.
Remember: do not add a .gitignore or a README.md file. The repo must be empty for simplicity. - After setting up the remote, type
git remote add origin
where is the URL of the repository copied using the green copy button. - Then type
git branch -M main
and finallygit push -u origin main
- Navigate into this repository by typing the following:
cd
Replace “ with the correct repo name, i.e.lets-git-it
in this case. If you are creating a repository from scratch,
use the name of the folder which you created. - List the contents of the directory
- If you are not using Git Bash but CMD or Powershell on a Windows-based system, type
dir
otherwise type the next command. - In MacOS and Linux-based systems, type
ls -la
- If you are not using Git Bash but CMD or Powershell on a Windows-based system, type
- You will notice some files, along with a special folder named .git. In case you are creating a repo from scratch, only the .git folder will be visible.
Seeing the changes
To see the changes made to files, typegit status
This will show you which files are in the staging area and which are not.

git statusGit will show that your branch in the repo is up to date with the remote branch. The output also shows “nothing to commit” since no files have been added to the staging area. The phrase “working tree clean” means that no new files have been added into the repo, nor have existing files been modified.
Making changes
Create a new folder with your GitHub username (or pseudonym). On MacOS and Linux-based systems, type: mkdir <foldername>
where <foldername> should be your GitHub username(or a pseudonym).
Also create a new file named like this ‘Mar-03-2021.md’. The .md is used to recognise Markdown files. These files can be easily rendered by GitHub. You can create a new file using this command:touch <filename.md>
The above command will work in Git Bash (on Windows), MacOS and Linux-based OSes. Change the date according to your needs. If you are using Git using CMD or Powershell in Windows, then type:copy NUL > <filename.md>
Note that the first > is required in this command. Edit the file using the example task list (in the rapteon folder) as an example. If you haven’t used the command line before, try using a GUI (such as the FileExplorer on Windows) to create a new file in the repository.
Add the file to the staging area by typing:git add <filename.md>
Again check the status of the files by typing:git status
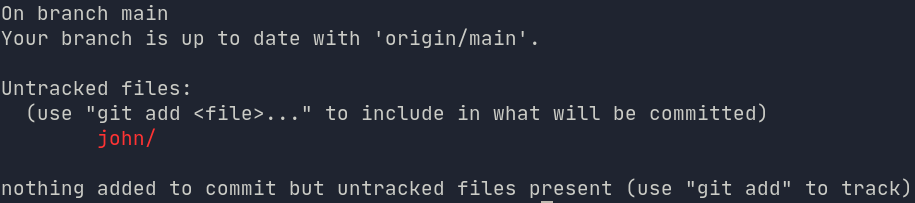
git statusIf you are running the command within the directory containing the file, the output will slightly different.
Committing the changes
Commit the changes by typing:git commit -m "<message>"
where the <message> explains the reason for the commit.
In case you want to mention the changes in a longer message, type:git commit
This will open a new text editor window, wherein you can mention the changes.
In most cases, the editor which will open depends on how git has been configured. To change the default editor, type:git config --global core.editor <yourEditor>
where <yourEditor> must defined in the $PATH variable. You can find out how to add an executable to the $PATH by searching online.
Note:
First time users of Git will notice that the Git produces an error message when they try to commit.
Error Message Shown
This can be easily resolved by typing the following commands one after the other:
git config --local user.name ""
git config --local user.email ""
Here, and are required for the commit object to be created for snapshotting.
Substitute your username and a preferred email ID in the above commands.
Pushing to the remote
Before pushing your content, make sure that you have made all the changes which you wished to do. Ensure that all the modified (or new files) are added to the staging area and committed. After this, perform the commit operation, and finally type:git push
You will need to enter your GitHub username and password. This command will push the changes to the remote you have configured. In case you have two-step verification enabled, refer to this post to generate an API token.
If you followed the process of cloning the repo to your local machine, trying to push the changes will show an error, since the repository is owned by me. In this case, there are two alternatives:
- Create a new repository and push the contents of the current repo there. This will give you an idea of how to use Git for your own projects. To create a new repository, refer steps 5 through 7 from the note to create a new repo (mentioned during ‘Cloning a Repo’)
- Fork the repository by logging into your GitHub account. Then clone the newly created repo (visible in your account) and follow the note given in the ‘Cloning the Repo’ section. This option is useful if you want to contribute to the list of tasks for the space elevator. After pushing your changes to your repo, you can create a pull request using the GitHub GUI, and I’ll add in your changes to my repo if it is reasonably creative 😁.
To see your changes on the remote, login to GitHub and open the repository page. You will see the new folder and the changes made to the files, if any.
Note:
To push your changes to a remote, you will first need a remote repo. Create a remote repository by following steps 5 to 7 from note mentioned during the Cloning step.
Enfin
Congratulations ! You have successfully added a file to version control for tracking and even pushed it to the remote. Try making some changes to the committed files, and you’ll notice that running:git status
will again show the file(s) as modified.
I hope that the first part of this guide helped you understand Git and its terminologies. Branching and pull requests haven’t been explained in much detail, but will be done in the second part of this guide. Stay tuned !